Strawberry Cake from Scratch, no mixes or gelatin

So this is late, like really late… But better late than never, right?

I made this cake for my significant other’s birthday… in August… Yes, I know it’s October.

The good thing is, I might have more time to post, now that I am no longer working a job that was extremely stressful for me and pretty much sucked the fun out of life completely. I have a job now, so no worries there, but it is a bit less related to my degrees. The trade in status is ok with me for now. I’m excited to hopefully get my health back. I am sure that making lots of cakes such as the one below will definitely improve my health, haha.

Strawberry Cake for an August Birthday

Strawberry Cake for an August Birthday

Strawberry Birthday Cake – no mix, no fake stuff
Adapted from Saveur

16 tbsp. unsalted butter, softened, plus more for greasing pans
2 3/4 cups flour, plus more for pans
1 cup crushed freeze-dried strawberries, divided (crushed to a powder)
1 tbsp. baking powder
½ tsp. kosher salt
1 cup milk
½ cup seedless strawberry jam
2 cups sugar
1 cup canola oil
1 tsp. vanilla extract
3 eggs
8 oz. cream cheese, softened
1 1-lb. box confectioners’ sugar, sifted
Fresh strawberries for decoration

1. Heat oven to 350°. Grease and flour two 9″ round cake pans; set aside. Whisk together flour, 1/2 cup freeze-dried strawberries, baking powder, and salt in a medium bowl; set aside. Whisk together milk and jam in a small bowl; set aside. Beat together sugar, oil, vanilla, and eggs in a mixer on medium-high speed until pale and smooth, 2–3 minutes. In 3 additions, alternately add dry and wet ingredients to sugar mixture, beginning and ending with dry; mix until combined. Divide batter between prepared pans and smooth tops; bake until a toothpick inserted in the middle of cakes comes out clean, about 40 minutes. Let cool 15 minutes, unmold, then cool completely.

2. In a large bowl, beat butter and cream cheese on high speed of a mixer until smooth and fluffy, 1–2 minutes. Add remaining confectioners’ sugar and freeze-dried strawberries; beat until smooth. Place one cake upside down on a cake stand, and spread 1/3 frosting over top. Cover with second cake, top side up; frost top and sides of cakes with remaining frosting; refrigerate for 1 hour before serving. Serve at room temperature.

Summer Pavlova for a Friend’s Homecoming

IMG_1437

Sweet Spatulas __ Pavlova

There’s not much better than your significant other scooping you up in their arms, placing you on the couch, and telling you to stay there and watch a movie “or else,” while they head into the kitchen to clean up the mess you made while baking muffins and granola bars earlier as well as to prepare a delicious dinner for the both of you. All because today is the last day of your period of unemployment, the eve of your first day ever of a “big kid” job.

Yes, that is the situation I find myself in right now. Trying to pay attention to The Hobbit, but wanting to post this, since it’s been, yet again, a full month in between posts. I’ve definitely been cooking. In the past month or so, I have begun to cook not just for me, but for 2-3 marines also (they pay for my groceries, haha). Definitely been learning a lot… I understand why spaghetti is such a popular meal and why people complain that boys eat so much! I used to calculate 1/4 lb of meat for each person, I now calculate 1/2 lb… It’s so fun having a full house though. Earlier this week, I hosted a BBQ for eight people or so and enjoyed how everyone pitched in, brought a dish, and just had fun hanging out by the pool and the grill.

As I am about to start work and have an arrangement to cook 2 nights a week while two other people cook 2 nights a week each, I am becoming very familiar with crock pot recipes. I am trying to find unique crock pot recipes, so if you have any good ones, feel free to send them my way. So far, I am doing baked ziti, lasagna, pot roast, BBQ chicken, pork chops, enchiladas, chicken cacciatore.

Anyway, some of my friends went away for a couple weeks for work, so upon their return I had the dessert below ready for them.

Layered Pavlova with Fresh Berries
Adapted from Epicurious

For meringue:

  • Confectioners sugar for dusting
  • 1 cup superfine granulated sugar
  • 1/2 cup packed light brown sugar
  • 1 1/2 tablespoons cornstarch
  • 1 1/2 teaspoons pure vanilla extract
  • 2 teaspoon distilled white vinegar
  • 3/4 cup egg whites (from 5 to 6 large eggs) at room temperature 30 minutes

For berries:

  • 1 1/2 pounds strawberries, trimmed and quartered
  • 1 pound bueberries
  • 2 tablespoons granulated sugar

For cream:

  • 1 cup chilled heavy cream
  • 1/3 cup chilled sour cream

Make meringue:

Preheat oven to 275°F with rack in middle. Lightly butter 2 (9-inch) round cake pans, then dust sides of pans with confectioners sugar, knocking out excess. Line bottom of each pan with a round of parchment paper.

Pulse superfine sugar, brown sugar, and cornstarch in a food processor until well combined.

Stir together vanilla and vinegar in a small bowl.

Beat egg whites with a pinch of salt using an electric mixer at medium speed until they hold soft peaks. Increase speed to medium-high and add sugar mixture 1 tablespoon at a time. After all sugar has been added, beat 1 minute more. Add vinegar mixture, then beat at high speed until meringue is glossy and holds stiff peaks, about 5 minutes. Spoon meringue into pans (about 2 1/2 cups per pan) and smooth tops.

Bake until meringues have a crisp crust and feel dry to the touch, about 1 hour (insides will still be marshmallow-like).

Turn oven off and prop door open slightly with a wooden spoon. Cool meringues in oven 1 hour. (Meringues may sink slightly and crack while cooling.)

Run knife along sides of cake pans and carefully turn meringues out of pans. Carefully peel off parchment (meringues will be fragile and the crust may crack further). Carefully turn right side up.

Macerate fruit while meringues cool: 
Toss berries with sugar and let stand at room temperature until ready to use (up to 1 hour).

Assemble dessert:
Beat heavy cream with sour cream using an electric mixer until it just holds soft peaks. Put 1 meringue on a serving plate and spread one third of whipped cream over it. Spoon one third of fruit (with juice) over top. Repeat with remaining meringues, cream, and fruit.

Banana Cream Pie with Bourbon Caramel Sauce and Peanut Crust

I don’t know about you, but most of my life seems to be spent going from one point to another: a goal, an achievement, a restaurant, a workplace, a life phase. I like to plan for my next destination, but I often forget to pay attention to what’s going on between the two points, the transition.

Transitions. That’s what the focus of my weekly yoga class was. Typically, yoga class is spent holding poses, moving from position to position, in the most efficient and danger-minimizing way possible. This week, however, we spent very little time in the actual pose, and focused on the transition. We spent more time getting to the pose, focusing on how we were moving towards a position, rather than actually in the position. The transition is often where everything happens. Yes, breathing and remaining present in an actual pose should be a focus, but being present (emotionally, mentally, physically) in the transition should be just as much of a priority, if not more so, since most of our lives our lived in transition.

Getting caught up in planning what my endpoint is going to look like is so easy for me; I slip into organizing mode and miss the wonder and awe right in front of me. To be honest, focusing and going slowly through the transitions to give them the full attention and respect they deserve actually hurt. It required much more concentration and strength and muscle control than usual. However, it gave me the time to be able to listen to my body and hear it when its wisdom was telling me to change directions. Normally, I’d be so focused on the next pose, that I wouldn’t have heard that whisper saying, “you know, maybe you shouldn’t go into that deep lunge today, perhaps you should stay Warrior Two, or move to a side stretch instead.”

Remaining present and choosing to live in the transition, rather than live for the endpoint, allowed me to stay present enough to be aware of my needs, my potential, my limitations, and my desires in a way that would not have happened otherwise. I was able to receive the wisdom to change course even in the middle of a transition -to change my goal because the purpose was not the goal, but to live and engage with myself and the environment.

So my take away is: I don’t want to be so focused on my end pose, or next life goal, that I miss an opportunity to respect myself and experience something unexpected and good, even if it was not what I originally planned.

Yoga is not the only thing that has taught me this lately. The necessity for spontaneity (and the outright inability to plan) when being in a relationship with someone in the military has really hit me hard smacked me in the face this week. I had been so focused on my goals and plans and ideas that I had missed the reality of the situation. I was feeling insecure because of [what appeared to me to be] another’s lack of interest in planning with me, when really, it was a lifestyle/survival choice of that other because they know that anything and everything can change in the blink of an eye. Living in the transition, rather than the goal, helped me see that. It changed my perspective. My insecurity no longer had a place to grab hold of in that situation and I was able to appreciate that the other person was actually trying to show me grace and compassion, not avoid being with me.

When I got home from yoga, I decided I want to celebrate. I was feeling overwhelmed -I had to go into child’s pose and simply cry with my face down in my mat several times during that class- and decided that making this pie was the best way to live in the moment. I had wanted to make it for a a few months, but other “goals” kept getting in the way. Baby steps, right? I might as well live in the moment, take a rest, and make a pie, instead of going to bed early so I could make it to that gym class tomorrow. Planning is good, but being present is the lesson that I need to be living out right now.

Banana cream pie with salted bourbon caramel sauce, peanuts, and whipped cream

Banana cream pie (salted bourbon caramel sauce, peanuts, and whipped cream not pictured)

Just a note: THE SAUCE IS AMAZING. If you don’t make the pie, just make the sauce and put it on EVERYTHING. I highly recommend using it to top high-quality vanilla ice cream.

Banana Cream Pie wit Bourbon Caramel Sauce and Peanut Crust
From Bon Appetit
Serves 8

INGREDIENTS

Crust

  • 1 1/4 cups cups unsalted, dry-roasted peanuts
  • 1/2 cup all-purpose flour
  • 1/2 teaspoon kosher salt
  • 1/4 teaspoon baking soda
  • 1/4 cup (packed) light brown sugar
  • 1/4 cup sugar
  • 2 tablespoons (1/4 stick) unsalted butter, room temperature
  • 1 large egg yolk
  • 1/4 teaspoon vanilla extract

Cream Filling

  • 2 cups whole milk
  • 3/4 cup heavy cream
  • 1/2 cup sugar
  • 3 tablespoons cornstarch
  • 2 tablespoons all-purpose flour
  • 1/4 teaspoon kosher salt
  • 5 large egg yolks
  • 1/4 cup (1/2 stick) unsalted butter, cut into 1/2″ cubes
  • 1 teaspoon vanilla extract

Assembly

  • 3/4 cup heavy cream, divided
  • 2 tablespoons powdered sugar
  • 1/2 cup sugar
  • 1 1/2 tablespoons bourbon, divided
  • 1/2 teaspoon honey
  • 3 tablespoons unsalted butter, cut into 1/2″ cubes
  • 1/4 teaspoon kosher salt
  • 3/4 teaspoon vanilla extract
  • 3 ripe bananas

DIRECTIONS

Peanut Crust

  • Preheat oven to 350°. Pulse peanuts in a food processor until coarsely ground. Transfer 1/4 cup ground nuts to a small bowl; cover and set aside for garnish. Pulse remaining peanuts until peanut butter forms, about 2 minutes.
  • Whisk flour, salt, and baking soda in a medium bowl. Using an electric mixer, beat both sugars, peanut butter, and butter until well combined and mixture resembles wet sand, 2–3 minutes. Beat in egg yolk and vanilla, occasionally scraping down sides of bowl, until well blended, about 3 minutes (mixture will be clumpy). Gradually add dry ingredients; beat just to combine (mixture will be crumbly; do not overmix or crust will be tough). Gather dough with your hands, place in pie dish, and press evenly onto bottom and up sides of dish. Bake until edges are deep golden brown, 15–17 minutes. Let cool on a wire rack. DO AHEAD: Can be made 2 days ahead. Cover tightly.

Cream Filling

  • Bring milk and cream to a simmer in a medium saucepan. Meanwhile, whisk sugar, cornstarch, flour, and salt in a large mixing bowl. Add egg yolks; whisk until smooth (mixture will be very thick). Whisking constantly, gradually add milk mixture to yolk mixture. Return to saucepan and cook over medium-low heat, whisking constantly, until thick, 2–3 minutes. Transfer to a blender with butter and vanilla. Purée until smooth, 1–2 minutes. Transfer to a medium bowl; press plastic wrap directly onto surface of pastry cream. Chill until set, AT LEAST 2 hours. DO AHEAD: Can be made 2 days ahead.

Assembly

  • Using an electric mixer or whisk, beat 1/2 cup cream and powdered sugar until medium-stiff peaks form. Cover and chill.
  • Stir sugar, 1 tablespoon bourbon, corn syrup, and 1 tablespoon water in a medium deep saucepan over medium-low heat until sugar dissolves. Increase heat, bring to a boil without stirring, and cook, occasionally swirling pan and brushing down sides with a wet pastry brush, until sugar just barely turns a light tan color, about 4 minutes (mine continued to cook after, so I took it off at a light tan color, though you might be cooler than me and be able to actually get yours to a dark amber color without burning… I can’t). Remove caramel from heat; whisk in remaining 1/4 cup cream, butter, and salt (mixture will bubble vigorously). Let cool for 5 minutes; whisk in remaining 1/2 Tbsp. bourbon and vanilla. Let bourbon caramel cool slightly. DO AHEAD:Whipped cream and bourbon caramel can be made 2 hours ahead. Re-whisk whipped cream before serving. Let bourbon caramel stand at room temperature.
  • Spread 1/4 cup vanilla pastry cream evenly over bottom of peanut crust. Slice bananas into 1/4″-thick rounds. Layer half of the bananas over pastry cream. Top with 1 1/2 cups pastry cream. Arrange remaining bananas over; top bananas with remaining pastry cream. Garnish with whipped cream and reserved ground peanuts. Serve with bourbon caramel.

Lighter-Than-Air Chocolate Roll (Flourless)

I’ve wanted to make a cake roll with cream filling since about my freshman year in college, ever since my boyfriend-at-the-time raved about the one his mom made, but I have always been too scared. But something kept holding me back -I was afraid to put all of the time and effort into something that seemed so labor intensive and bound to break anyway. How on earth, if I managed to whip the egg whites correctly and not burn the thin layer of cake, would I get it out of the pan, spread with filling, actually roll it in a way that it didn’t break and stayed rolled, and then actually transport it (even if it just across the room to the table) to the desired place and/or persons for consumption?

Yummy... as told by iPhone, so not particularly beautiful, but delicious all the same.

Yummy… as told by iPhone, so not particularly beautiful, but delicious all the same.

Well, as you can see, I decided to just get over my fear of failure and try the cake anyway. It doesn’t have that many ingredients and most of my friends were busy, so I figured I didn’t have much to lose… Maybe that’s not facing my fear, maybe that’s just no longer having anything to lose… I think that will have to be a self-reflection for another blog post though.

In the same way, I need to just get over my fear of failure and realize that, even if I am unemployed 5 weeks from now and have to live on one of my parents’ couches, I won’t be ruined forever… though it may actually kill me slowly from the inside…. 0=)

Anyway, the cake was great. I would definitely consider it worth making again. I brought it over to my friend’s house a couple days later so I had someone with whom to share it -eating a cake alone just seemed like a bad idea. He liked the chocolate flavor and the texture, but he apparently doesn’t like the combination of chocolate orange *GASP,* so I said I would make it again sometime without the orange. I, however,love chocolate and orange. It reminds me of getting those Terry’s Chocolate Oranges for Christmas every year at the bottom of my stocking. I loved having to slam it against the ground to make all of the individual slices separate, though sometimes I think I was a teensy afraid I would break it and then have nothing but smashed chocolate instead of the pretty chocolate “slices” (I seriously doubt I will ever be strong enough to actually do that though) . After slamming the chocolate orange and unwrapping it from it’s foil, I would proceed to eat a few slices at a time every few days, hours minutes. Yum…

Anyway, this chocolate cake reminds me of those oranges. And of those delicious candied orange peels dipped in dark chocolate there were probably the most popular thing I have ever made in my entire life.

Sharing my cake with a friend who apparently couldn't even stay awake to try it! But he did have some for breakfast the next day, I was told.

Sharing my cake with a friend who apparently couldn’t even stay awake to try it! But he did have some for breakfast the next day, I was told.

Lighter-Than-Air Chocolate Roll
From Epicurious
Serves 10

Cake layer:

  • 6 oz fine-quality bittersweet chocolate (not unsweetened), chopped
  • 3 tablespoons water
  • 6 large eggs, separated, at room temperature
  • 2/3 cup sugar
  • 1/4 teaspoon salt
  • 1 tablespoon Dutch-process unsweetened cocoa powder

For filling:

  • 1 cup heavy cream
  • 3 tablespoons confectioners sugar, sifted
  • 2 tablespoons Grand Marnier
  • 1 teaspoon finely grated fresh orange zest
  • Garnish: unsweetened cocoa powder and confectioners sugar

Make cake layer:
Preheat oven to 350°F. Oil a 15- by 10- by 1-inch shallow baking pan and line bottom lengthwise with a large piece of wax or parchment paper, letting paper hang over ends by 2 inches.

Melt chocolate with water in a small heavy saucepan over very low heat, stirring. Cool to lukewarm.

Beat yolks, 1/3 cup sugar, and salt in a large bowl with an electric mixer until thick and pale, about 5 minutes in a standing mixer or about 8 minutes with a hand-held mixer. Fold in melted chocolate until blended. Beat whites with cleaned beaters until they just hold soft peaks. Gradually add remaining 1/3 cup sugar and beat until whites just hold stiff peaks. Fold one third of whites into melted-chocolate mixture to lighten, then fold in remaining whites gently but thoroughly.

Spread batter evenly in baking pan and bake in middle of oven until puffed and top is dry to the touch, 15 to 18 minutes. Transfer pan to a rack. Cover top with 2 layers of damp paper towels and let stand 5 minutes, then remove towels and cool completely. Loosen edges with a sharp knife.

Sift cocoa powder over top of cake layer and overlap 2 layers of wax paper lengthwise over cake. Place a baking sheet over paper and invert cake onto it, gently peeling off wax paper lining. (Don’t worry if cake layer breaks; it will hold together when rolled.)

Make filling:
Beat cream with confectioners sugar and Grand Marnier with cleaned beaters until it just holds stiff peaks. Fold in zest.

Fill and roll cake:
Spread filling evenly over cake. Put a long platter next to a long side of cake. Using wax paper as an aid, roll up cake jelly roll–style, beginning with a long side. Carefully transfer, seam side down, to platter, using wax paper to help slide cake. (Cake will crack but will still hold together.)

Dust cake generously with cocoa powder and confectioners sugar.

Rosemary Sweet Potato Egg Bake

Woah, seriously, over 3 weeks since I last posted? Where did the time go? I mean, last time I posted it was winter, and now it’s spring! I am so psyched for spring, and particularly the cherry blossom festival in DC that I get to experience for the first time. I even called my mother to ask her to ship me some of my warm-weather clothes, such as the multitude of sandals, open-toed heels, sundresses, shorts, and sleeveless tops that I own from years of living in one of the most humid and tropical states (Florida) for 17 years.

I just wish I could wear sundresses and sandals all year round. There are a few things I miss about Florida, the warm weather being one of them… but I don’t miss having to go to PE every year in August and September -I think that just about killed me every time. I can’t tell you how hard I tried to get out of PE every year. You’d think I was going being sent to some kind of work camp, the way I was so desperate to avoid it -pretty sure I started to pray for asthma at some point just so I would be able to go to art or drama instead.

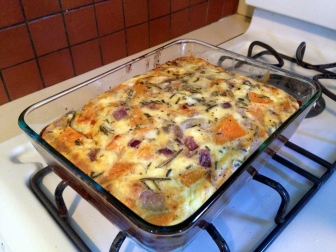
Yummy Brunch - Sweet potato egg bake and sautéed spinach.

Yummy Brunch – Sweet potato egg bake and sautéed spinach.

I made this egg bake the other day when I friend came over for brunch. We enjoyed it with sautéed spinach and mimosas in my dining room while enjoying some great girl talk. What could be better than good food and goof friends, eh?

This meal is very easy to make and I would say is considerably healthy. It’s also good for vegetarians and gluten-free people (sorry, vegans).

Fresh out of the oven, ready for brunch with good friends.

Rosemary Sweet Potato Egg Bake
Adapted from Naturally Ella
Serves 3-4

Ingredients:

3/4 lb sweet potato
1 medium red onion
2 tablespoons fresh rosemary, minced
1 tablespoons olive oil
½ teaspoon salt
½ cup feta or goat cheese
5 eggs
1 cup milk
½ teaspoon black pepper

Directions:

Preheat oven to 375˚.

Slice potato and red onion into ¼” thickness. Toss with olive oil, rosemary, and salt. Place in a 9″ pie plate or 7×11 baking dish and roast until potatoes are tender, 30-40 minutes.

Once potatoes are done, loosen from the bottom of the pan. Sprinkle cheese over potatoes.

Whisk together eggs, milk, and black pepper. Pour over cheese and potatoes. Return to oven and back for 40-50 minutes or until egg is set (the egg should puff up and hardly jiggle.)

Remove from oven and let cool slightly before serving.

National Convention = Travel-friendly, Healthy, Affordable Meals

This week has me traveling for work. Getting on a plane with a suitcase full of business clothes to arrive a few hours later at a convention center felt a little surreal. I am sure that in a few years, once I get a “real” job, that surreal feeling will give way to “this is such a pain,” but I will enjoy the excitement for now.
Being in a new city for a couple months, away from my family and friends and a familiar community, has got me thinking about the importance of relationships lately. Granted, I’ve been at least 800 miles from my family for over 6 years now, but every time I take another step in life (college, grad school, post-grad internship), I recognize my need for family a little bit more. Absence makes the heart grow fonder, as well as makes one realize that true loved ones are rare and to be cherished.
I was reading a blog that was shared by one of my former yoga instructors, who I dearly miss, and was struck by the exercise that was mentioned. It seems like a great self-care exercise and a reminder of who is important in our lives, as well as why we should value ourselves so we can take a step away from insecurity and a step towards loving others better.
I want to challenge you to do this exercise. Before reading it, make sure you are ready to actually do it. I think it works best that way, when you haven’t read it and had time to think through the whole thing before writing your response.
For the Exercise: Find a quiet, restful place, whether it’s on your yoga mat, on the couch  or simply your kitchen table -I prefer the open, vulnerability and simultaneous security of my yoga mat. Have a pen and paper ready.
…………….
Think of someone who loves you.
…..Did you pick your person? Don’t read on until you do, ok?
I’m giving you one more chance to not look ahead…
…………………..
Ok, promise me you’ve thought of your person and have a writing utensil and paper near you…
…………………….
Once you choose your person, write a description of yourself in the voice of that person, from their perspective.
How do they see you? Your potential? Your worth? Your value?
I’d love to hear your experience with this.
I thought of my mother. It was powerful to remember that she has such faith in me and believes that I really can obtain my goals and that she will support me whether or not they are realized. Let’s just say I got a little teary eyed and little things didn’t bother me so much the rest of the day.
—————————
So back to that pesky traveling for work thing:
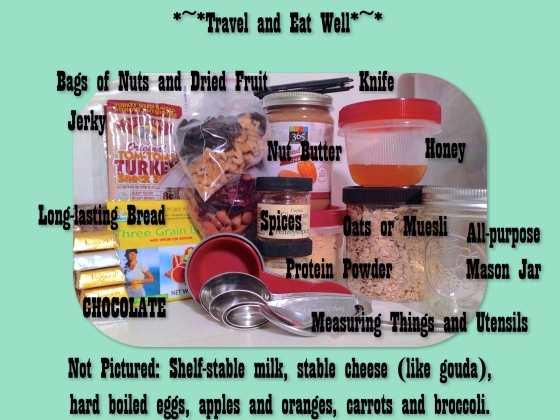
ConventionFood
Food Packing List
(italicized denotes an item that may need refrigeration, so either pack in a cooler or buy when you get there, if you have access to a fridge)
Calcium – shelf stable milk, cheese, yogurt (fyi, I’ve switched completely to buying only plain, organic dairy)

Protein – high quality meat jerky, almond butter, protein powder, tuna, hummus, hard-boiled eggs

Complex Carb – old-fashioned oats (you can pre-measure into baggies), bread-like crackers (the funky kind at your health food store), wheat pita pockets, long-lasting bread, whole wheat tortillas

Fruit – apples, oranges, bananas

Veggie – carrots, green beans (raw, washed green beans are delicious!), raw broccoli

Random: cinnamon, curry, honey, flax seed, nuts, dried fruit

Category All Its Own: DARK CHOCOLATE (for any and every occasion, duh)

Potential Meals
  • Tuna, nuts, chopped green beans,  curry powder, pita, (optional: yogurt or hummus)
    • Mix all ingredients (including yogurt or hummus, except pita pocket); fill pocket with that mixture
  • Tuna, carrots, crackers, nuts, (optional: cheese or shelf-stable milk)
  • Jerky, orange, crackers, shelf-stable milk (or cheese)
  • Oats, banana, nut butter, shelf-stable milk (or hard boiled eggs)
    • Prepare oats with water, stir in mashed banana, and nut butter (cook in microwave or let sit overnight to become more like muesli). Enjoy with milk or eggs as a side.
  • Carrots, pita, cheese, jerky (or hard-boiled eggs)
    • Fill pita with jerky or eggs and cheese. Enjoy with carrots.
  • Banana, nut butter, pita, shelf-stable milk (or yogurt with honey and cinnamon)
    • Fill pita with banana and nut butter, enjoy with milk.
  • Apple, jerky, nuts, crackers
  • Jerky, green beans, crackers, shelf-stable milk (or cheese)
  • Carrots, crackers, jerky (or hummus), nuts with dried fruit (or cheese)
  • Apple, cheese, pita, jerky (or hard-boiled eggs)
    • Fill pita with sliced apple and cheese. Enjoyed with jerky or eggs.

The Chocolate Cake Recipe David Lebovitz Found on a Men’s Room Wall

Yup, you read that right. David Lebovitz, the master of all things delicious and Parisian, found the recipe found below on the wall of a room where men, well, yeah… But don’t let that throw you. This cake is so easy and so delicious. And it’s perfect for all those gluten-free people in your life -don’t deny it, we all have at least one friend who is GF who drives us crazy when trying to figure out what to cook.

A flourless chocolate cake.

A flourless chocolate cake.

I have been settling into DC fairly well the past few weeks. I just started my third week of semi-adult work and am pretty happy. I spent this past weekend enjoying the company of new friends. Some I met through work, others through my new church. No matter what I did though, I was pretty intent on staying inside, as the weather was miserably cold and wet, in my opinion. So Saturday, instead of going out, I stayed in and make steak, potatoes, broccoli, and flourless chocolate cake (which I served with Talenti black cherry gelato… um, to.die.for.)

Hanging out with new friends and trying some new recipes... looks like I might have some trouble actually tasting the treats I make...

Hanging out with new friends and trying some new recipes… looks like I might have some trouble actually tasting the treats I make…

Oh, and when I got home from work tonight, what did I have for dinner? Yes, I pulled a cliche single-girl-in-the-city move and opened a small bottle of red wine and ate a rather large slice of cake with a dollop of that delicious gelato beside it. No need for real meals, such things are overrated on cold, wet, dark Monday nights.

If you are looking for an easy dessert for Valentine’s day, I would say this is it. The texture is decadent and would be perfect if you are going for something, ummm, almost sensual… Yes, I just said that a chocolate cake was sensual. Just try it. You will totally understand and then maybe you won’t look at me that way. The texture is just amazing. Somewhere between a souffle and a mousse. Make this!

Racine’s Cake via David Lebovitz
Makes one 9-inch cake
Taken off of In Jennie’s Kitchen

Cocoa powder, for preparing the pan

10 ounces (280 g) bittersweet or semisweet chocolate, chopped

1/2 cup (4 ounces/115 g) salted butter, cut into pieces

1 tablespoon freshly brewed espresso

1/2 teaspoon vanilla extract

6 large eggs, separated, at room temperature

1/4 cup (50 g) plus 2 tablespoons (30 g) granulated sugar

2 tablespoons (20 g) cocoa nibs (optional)

Powdered sugar, for dusting the cake (optional)

Preheat the oven to 350°F (175°C). Butter the bottom and sides of a 9-inch (23-cm) springform pan, dust it with a bit of cocoa powder, and tap out any excess.

In a large heatproof bowl, combine the chocolate, butter, and espresso. Set the bowl over a pan of simmering water and stir occasionally until the mixture is melted and smooth. Remove the bowl from the heat and stir in the vanilla.

In a stand mixer fitted with the whip attachment, whisk together the egg yolks and the 1/4 cup (50 g) granulated sugar on medium-high speed until the mixture is light and creamy, about 1 minute.

In a clean, dry bowl and with a clean whip attachment, whisk the egg whites on low speed until they begin to hold their shape. Add the remaining 2 tablespoons (30 g) granulated sugar and whisk on high speed until the whites hold soft peaks.

Fold the beaten egg yolks into the melted chocolate mixture, then fold in half of the whipped egg whites. Fold in the remaining whites, mixing just untiI there are no visible streaks of egg whites. Don’t overfold.

Scrape the batter into the prepared pan, sprinkle with cocoa nibs, if using, and bake until the cake feels as though it’s just barely set in the center, about 25 minutes (Jennie’s note: my cake only took 21 minutes—I always start checking a few minutes before directed finish time). It shouldn’t feel too firm. Let cool completely.

Run a knife around the sides of the cake to help loosen it from the pan. Release the sides of the pan and dust the cake with powdered sugar, if using.


New Adventure and a Quick lunch

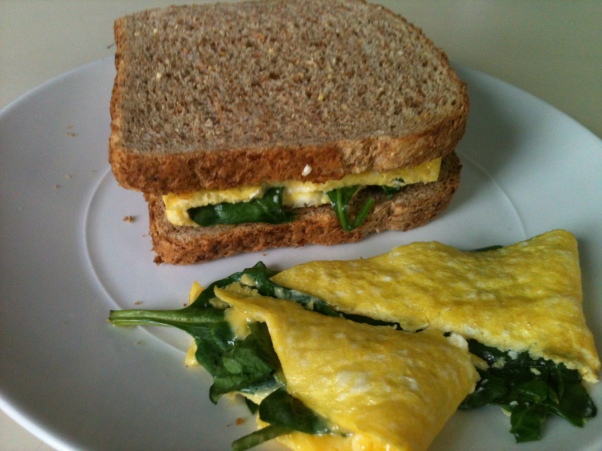
Feta Spinach Omelette sandwich

Hey everyone! So I know it’s been a while, like over two weeks, and that I usually post every few days, but things have gotten crazy around here! In the 6 weeks, I have spent about a week each in Kentucky, Pennsylvania, Tennessee, Florida, and  Washington, DC. Of course, I was cooking and baking the entire time, but I have been contemplating whether blogging the foods I make is a healthy behavior for me. Honestly, the whole food blog was becoming a bit of an obsessive/addictive behavior. When I wanted to talk a break from cooking or just taking a picture and writing down the recipe, there would be a sinister whisper in my ear saying, “but you have to post something!” It is the same whisper that says, “you didn’t go far enough on the treadmill today” or “What if you order an eggnog latte again? You should go for that second spin class in one day, just in case.”

Yeah, those are ugly words, aren’t they? And for the most part, I no longer listen to them, but for some reason, the whispers and nudges surrounding this blog were harder to set boundaries for. That’s why I didn’t past the few weeks. With the stress of graduating, traveling, visiting family, and transitioning to my new home in the US capital (which I still need to tell you about!), I needed to flat out say, “no, nothing, nada” to blog posting. It was a good break for me and now I think I might be ready to come back, but this year might have a different tone than last year.

For the next 5 months, I will be sharing an old house in the city with 6 other people -that means that I will also be sharing a kitchen and fridge with 6 other people, so my ingredients might become much more limited or will be calculated in order to be used in several meals in one week, since I cannot keep the entirety of Whole Foods in my fridge any more. In addition, I no longer have a car and am completely dependent on my own two feet and public transportation to get around -that has the same effect as sharing the fridge, but also means that I won’t be buying much of anything at all, especially heavy things, since I will have to carry them several blocks and/or on the metro.

With this new direction now explained, I will now share with you what I enjoyed for lunch today:

Feta Spinach Omelette Sandwich
Serves 1

2 eggs, beaten
1 oz feta, crumbled
Small handful of roughly chopped, fresh spinach (washed)
2 pieces of whole grain bread, toasted (I use Ezekiel bread)

Place the eggs in a greased or non-stick medium size skillet (8 inches?) over medium heat, swirling so as to cover the bottom of the pan, creating an entire disc of egg. Let cook so that the bottom is no longer translucent, but the top is still liquid/raw/uncooked.

Sprinkle the feta and spinach evenly on the eggs while the top half is still uncooked. When the rest of the egg is completely cooked, slide your spatula underneath one side of the egg disc and then fold it over so that you have half of a circle now.

Cut either edge of the omelette off that the middle part of the size of your pieces of bread. Place the bread-size piece of omelette between your pieces of bread, serve the leftover omelette corners on the side of your sandwich.

Enjoy!


Pumpkin Cinnamon Rolls

Mmmmm, I love pumpkin. Especially when its folded into yummy carbs and sugar and fats. Adding all of the holiday-related spices definitely make the pumpkin flavor even better.

Today I am visiting a friend in Pennsylvania, kind of taking a break from life after all the comprehensive exam and graduation craziness -though I do still have one paper to finish for my independent study… I’ll put that off until tomorrow, I think. It’s surprisingly nice up here (pretty much snow and the weather has been in the 40’s). I even tried a new risotti recipe on my friend’s family that turned out well! -Yes, I make new recipes for important people… Yes, I know that’s just asking for trouble, but it has worked out well for me so far, so I am not tempted to change my ways as of right now.

Pumpkin Cinnamon Rolls
From Young Homemakers

Dough:
4 to 4-1/2 cups unbleached all-purpose flour
2 teaspoons instant yeast
1/3 cup sugar
1-1/2 teaspoons salt
3/4 tsp. baking powder, optional (I wanted more rise on mine and I’ve trouble with my rolls falling after the first rise in the past. I think adding this helped!)
1/2 tsp. pumpkin pie spice
2 eggs
1 (15-ounce) can pumpkin
4 tablespoons vegetable oil

Filling:
3/4 cup packed light brown sugar {I was almost out so substituted 1/2 cup with dark brown sugar}
1 tablespoon pumpkin pie spice
1 tablespoon melted butter

Icing:
Mixture of milk and powdered sugar

1. Combine flour, yeast, sugar, salt, and baking powder (if using) in a large bowl; set aside. In a stand mixer, combine eggs, pumpkin, and oil until well mixed. Slowly add flour to egg mixture until all combined together; add more flour as needed until dough no longer sticks to the side of the bowl. I like to then move it to a counter where I can kneed the dough by hand a few minutes. You want it soft but not sticky/wet. Place dough in a large bowl drizzled with a little oil, cover, and let rise in a warm place for about an hour or until double in size.

 2. Make the homemade pumpkin pie spice. Combine all the filling ingredients in a small bowl and set aside until ready to use. Grease a 9×13 pan and set aside.

 3. Roll dough out on a floured surface into a 16×12 rectangle. Spread dough with melted butter and sprinkle filling evenly across to the edges. Starting from the longer side, begin making a tight roll, gently pressing the “seam” together as you go. Cut the roll into 12 equal pieces using a sharp knife. Carefully place each slice flat side down in the prepared 9×13 pan side by side. Allow the rolls to rise another hour in a warm area or until rolls have just about reached the top of your pan and almost doubled in size.

Sweet Potato Pie

Today is the day that I will receive “the envelope.” Yes, I am referring to the envelope that contains the answer to the question, “Did all of these months of studying, constantly reading news sources, and stress-induced baking actually translate into a completed Master’s of Diplomacy and International Commerce?”

Although this post is going up at 5am (so I will be driving to the gym, to my last Chaos class (spin/bootcamp) before leaving town for [hopefully] better things, I will not get my envelope until 2pm, at which point I will celebrate (I’m optimistic right now) by putting on my new dress that I paid too much for and attending my school’s graduation reception with my family who has flown and driven into Kentucky for this occasion.

I mentioned before that there was much baking going on in my kitchen as a kind of stress-relief. One of those baked goods was a sweet potato pie for a classmate of mine who, despite having grown up in Kentucky, has never tasted the goodness that is a sweet potato pie. Well, I made sure to correct that hideous oversight as soon as I could and brought it to my Energy Security class within a few days.

Sweet Potato Pie
Adapted from Epicurious

  • 2 medium sweet potatoes (about 1 1/4 pounds)
  • 1/2 stick (1/4 cup) unsalted butter
  • 3/4 cup light brown sugar
  • 1/2 cup unsweetened vanilla almond milk*
  • 1/4 cup heavy cream*
  • 3 large eggs
  • 1/2 teaspoon cinnamon
  • 1/4 teaspoon nutmeg
  • 1/4 teaspoon salt
  • 1 tablespoon bourbon
  • 1 tablespoon all-purpose flour
  • 1 unbaked 9-inch pie shell (I use King Arthur’s recipe)

*Instead of vanilla almond milk and cream, you can use whole milk and a teaspoon of vanilla.

Preheat the oven to 350°F.

Prick the sweet potatoes with a fork and roast them on a shallow baking pan in the middle of the oven until very tender, about 1 1/4 hours. Cool to room temperature.

Raise the oven temperature to 400°F, and place a shallow baking pan on the bottom rack.

Scoop the flesh from potatoes into a bowl and discard the skins. Mash the sweet potatoes with a fork until smooth. Melt the butter in a small saucepan and stir in the sugar. Add the melted butter mixture to the sweet potatoes with the milk, cream and the eggs and beat with a whisk until smooth. Whisk in the remaining ingredients (the filling will be quite liquid). Pour the filling into the pie shell.

Carefully transfer the pie to the heated shallow baking pan on the bottom rack of the oven and bake until the filling is just set, about 40 minutes. Transfer the pie to a rack to cool.